While friends, relatives, and readers in the Midwest or East Coast may be quick to laugh at the idea, even those of us here in Arizona have anxiously been awaiting the return of spring. Emerging from the long weeks of a (somewhat) frozen winter makes us want to shake of the dust, throw open the windows and welcome the warm weather back into our homes. For many people, including myself, there is little better way to kick off the season than with a thorough bout of spring cleaning.
But despite the gratification of having a squeaky clean home, I’d be willing to bet not everyone is leaping for joy at the thought of spending a weekend buried in last year’s dirt and grime.
So this year, in order to provide myself with a bit of extra motivation, I have set forth a challenge: to pick the seven dirtiest, darkest areas of my home to not only clean and organize, but to illuminate with LED lighting… in the hopes that come next spring the results of my labor will still be glowing strong.
Ambitious? Perhaps. But more than worth a try for a woman who spends eight to ten hours a day dealing with LED lights. And hopefully, if I do my job right, my own experiences may help to inspire others to take up the challenge themselves (whenever the warm weather finally finds its way to your home!)
So without further ado, here are a few ways to incorporate LEDs into your yearly spring cleaning routine:
1. The Junk Drawer:
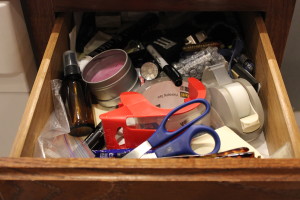 As soon as the words “dark” and “dirty” fluttered from my keyboard onto the screen, I immediately thought of one place; the junk drawer. No matter where I have lived over the years I have never been able to escape the terrible habit of creating that one little drawer stuffed with home office supplies, receipts, unknown keys, and more…
 Step one in revitalizing this area was to remove absolutely everything from the drawer. After giving everything a good cleaning, and throwing more than a few items in the trash, I set about installing the LEDs. Not wanting too much light in too small a space, I decided to line each edge of the drawer with Normal Bright Warm White flex strips. Along the front inside lip of the drawer I fitted a magnetic switch to allow the lights to turn on and off as the drawer was opened, and connected to a 1 Amp power supply underneath the cabinet.
The results were fantastic; what was once a pit of chaos is now well-lit, well-organized, and rather unfit to be called a “junk” drawer anymore.
2. The Coat Closet:
 For many, the linen or storage closet can feel as much of an endless void as the junk drawer. Fortunately, in my home there is only one real “coat” closet to speak of, and it is used for little beyond board games and snowboarding equipment. Nonetheless, the clutter can become hard to manage, especially in the dim light.
To rectify this situation I once again began by emptying out the space entirely, giving each shelf and corner a thorough going over with the dust rag and vacuum. Then, before returning everything to its place, I installed a single row of Super Bright Flexible LEDs along the upper inside corner of the closet ceiling. With a single power supply running to a special motion sensor, I was able to create a bright open storage space without even having to worry about a switch.
3. The Laundry Room:
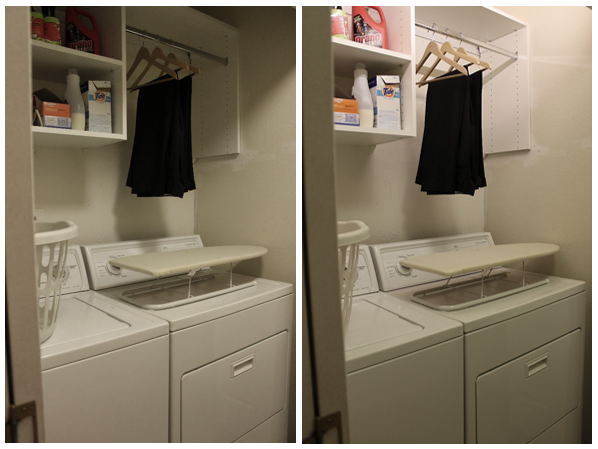 The cleaning process was a bit more challenging in this area- I was surprised (and somewhat disgusted) to see the amount of dryer lint and soap scum that had built up over the past year, but after some research, and a whole lot of scrubbing, I found white vinegar and baking soda to be wonderful allies.
Once everything was cleaned and dusted, I set about the task of incorporating LEDs into the room– I use the term “room” loosely here, as our laundry space is more of a closet than anything else. Still, this area requires a certain degree of task lighting that most closets do not, so unlike the front linen closet, I decided on Ultra Bright Flex for this location. I was able to run a small power supply from behind the dryer up to a simple in-line switch on the side wall. From there, it was as simple as attaching one of our convenient Tiger Paw® connectors to my LED strip, sticking it up along the ceiling, and plugging in the power supply.
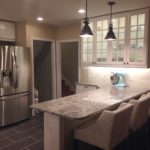
4. The Kitchen:
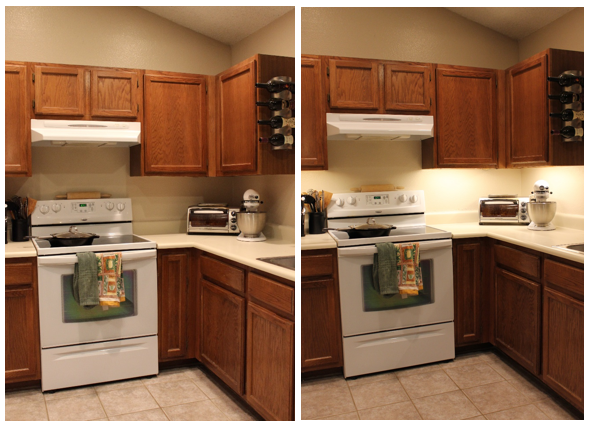 As one of the most commonly used areas of my house, the kitchen was a much larger project when it came to spring cleaning. After hours of organizing cabinets, cleaning dishes and countertops, appliances and floors, I was finally ready to install some LED accent lights. For the space under our cabinets I wanted enough light to facilitate reading a cookbook or measuring ingredients with accuracy. I also knew I wanted to be able to dim the lights as I pleased- although I did not want to worry about the hassle of hardwiring, so I settled on using Ultra Bright Warm White flexible LED strips along with Inspired LED’s new wireless Independence Dimmer.
I lined the under cabinet areas with LED tape, then ran the lights through the wireless dimmer module to a regular plug-in power supply. After programming and mounting the remote switch, the LED system fit in seamlessly with our existing hardware. I was amazed at how this simple installation added to the elegance and functionality of our kitchen!
5. Crown Molding:
 As a bit of a traditionalist when it comes to style, I love crown molding. In fact, it was one of the primary features which drew me to this house when I saw it for the first time. It’s a stunning feature, but unfortunately, one which rarely stands out against the shadows of an often under lit living room. The solution? LED lighting, of course!
Since this area would not need to be used for detailed visual tasks, I once again decided on Normal Bright LEDs, which could provide a nice ambient glow without overwhelming the room. I started by cleaning this area, hauling the vacuum up on top of a chair to reach the various dust bunnies that had collected throughout the year. But once the space had been cleared, LED installation was as simple as laying out a line of LED flex tape, wiring an in-line dimmer, and plugging in a 3.8 amp power supply. The effect makes a huge difference in brightening the living room, and after dark, the dim glow makes leaves just enough light for a midnight snack!
6. The Fireplace:
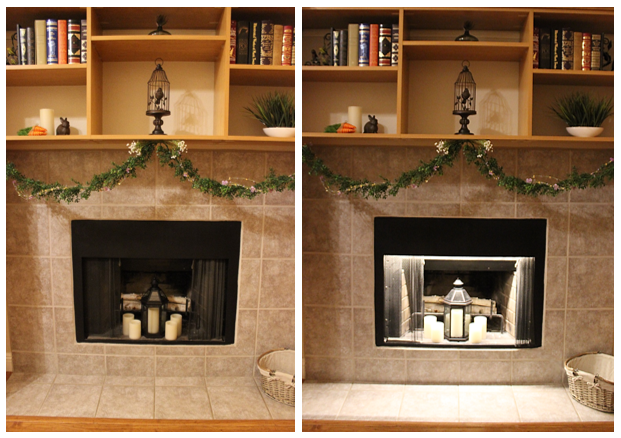 One of my favorite things about the wintertime is being able to cozy up beside a warm fire. Unfortunately, (or fortunately, depending on your perspective) there isn’t much opportunity to use the fireplace more than once or twice a year in Arizona. The rest of the time it acts as little more than a dingy black void in the middle of our living room. So here, I decided to get creative.
After dusting out the ashes and cleaning the flue, I installed a small strip of leftover Super Bright Flex under the mantelpiece. After running a small length of the cable discretely along the inside of the upper shelves, I connected the LED strip to the power supply I’d installed for the crown molding overhead. The resulting light transformed the empty fireplace into an eye catching centerpiece at the heart of the room.
7. TV Backlight:
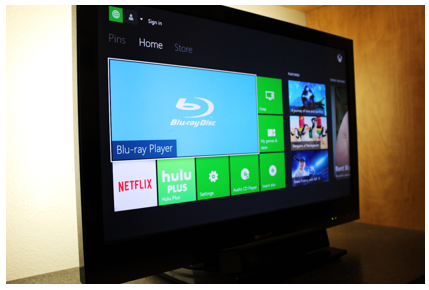 With the return of warmer weather, we may not have much of a desire to sit around in front of the television, but an occasional spring shower can be the perfect chance to curl up on the couch for some relaxation. In order to prepare for this opportunity, if and when it should arise, I decided to spend some time cleaning and organizing my entertainment center. Following my now-established routine, I began by removing all the items from shelves, dusting, and rearranging items. I found it helpful to set aside the less useful items, and put back only those that I favored. Everything else formed a donation pile for Goodwill.
I then used one of Inspired LED’s Universal TV Backlight Kits to add a bit of light around the back side of our television. Having selected the USB option, I was able to connect the LEDs directly to the USB connector on the TV, and this allowed the lights to turn on and off in sync with the television itself. This project was one of the easiest to tackle, but it made a tremendous difference in both the look and function of the room. After just a few days of using the backlight, I can hardly believe I ever watched TV any other way!
After more than a week’s worth of dusting, vacuuming, mopping, and scrubbing, I am pleased to say I’m finally ready to kick back, relax, and enjoy the lemony-fresh sensation of a clean home. Best of all, amidst the effort of spring cleaning, the addition of LED lights turned out to be a breeze! These few, simple upgrades added a whole new dimension of convenience and style to some of the dingiest parts of my home, transforming them into neat and bright spaces just in time for spring…
and hopefully, lighting the way to a clean rest of the year!
For more information and inspiration on ways to brighten your home with LEDs, check out our products at InspiredLED.com or contact our design team at design@inspiredled.com to get a free layout and quote!