We understand it is a little difficult to grasp the idea of how to install LED flexible strips under your cabinets if you’ve never done it before. LED lighting is still a fairly new technology for residential use, making “how-to’s” harder to come by than, say, installing halogens under your cabinets. Do you install it in the front or the back? What size do you order? Why flexible strips? How do I run it across the entire length of my cabinet? In this handy guide, we’ll go over the basics and answer common, yet very helpful, questions!
Let’s start at the beginning: Why flexible strips?
Inspired LED offers a few different types of light options.
- Designer Series panels are great if you can’t hide your LEDs. They come in both custom sizes and standard lengths, and are offered in kits.
- The Pro Series LED panels are easily hidden behind a small lip or light rail. They come in two standard sizes and are offered in kits.
- Radiant Edge Panels are a more custom, high-end fixture, best suited to those areas where your LED lights are going to be seen, often under cabinets where there is no lip to conceal the panel.
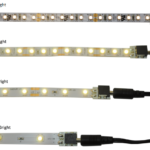
- The flexible strips come in custom sizes or in our Cut and Connect Series Kits, which let you cut your own strips. There are three different brightnesses and come in a variety of colors.
Now to the “why” of this question…
- They have 3M adhesive backing for easy installation
- They are a bit thinner than the Pro Series panels
- Custom lengths are available, meaning a more even distribution of light as compared to using multiple panels under one cabinet
- You will use less interconnect cables than with the panels
- Can choose the correct brightness for your application
- Can potentially be a cheaper option
What size do I order?
Measure the length of the cabinet and subtract 3 inches. This will allow enough room on each end of your flexible strip to plug in your power supply or interconnect cables.
How many strips do I order?
Typically, you’ll want to order one strip per section of cabinets. If you have a long cabinet that has frames (see below) which won’t allow you to run one continuous strip, you can do the following:
- Order one strip for each section in between frames. Connect each strip with an interconnect cable.
- Cut a 0.5 inch slot or hole in the frame. Gently slide your flexible strip through the slot or hole. See our video blog on “Installing Flexible Strips Under Cabinets with Frames” for more.
Where do I install the flexible strips?
This is really a personal preference, but we do have some recommendations.
- First, make sure to use masking tape or something similar to temporarily place your strips up. Trust us, you do not want to pull down all of your lights if you installed them in the wrong place!
- We recommend installing your flexible strips about 2 inches from the front of your cabinet.
- If you have granite and are afraid the light will reflect too much, install your LED strips on the lip of your cabinet, facing the back splash. It will still provide you with enough light, without showing every dot of the LED strip. See our video blog on “How to Reduce Granite Glare” for more.
- Play with your lighting! There is no right or wrong place to put it. Try to turn your LEDs on with your main lighting turned off or at night. Once you are happy with the placement, peel back the adhesive and stick your LEDs to your cabinet!