 Over the past few years, LEDs have become increasingly common thanks to their energy-efficiency, versatility, and ease of install. From retail signs to kitchen cabinets, bathroom toe-kicks to bar countertops, LEDs have helped give rise to the concept of light decorating in the modern world, transforming the simple and functional into something spectacular.
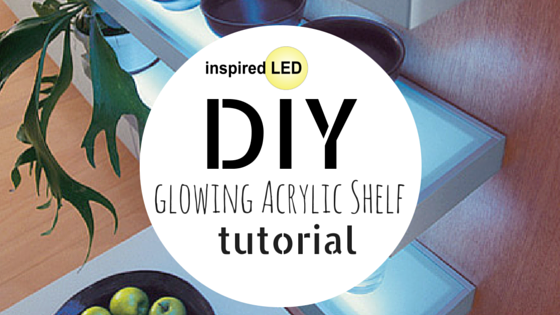
One of the decorating trends which has recently helped to make LED lights so popular, both in homes and in commercial settings, is the illuminated acrylic shelf. Whether it is for a series of small accents on your entertainment center, or a glowing sales counter for retail displays, this is an eye-catching effect which, believe it or not, is fairly easy to achieve. All you need is some basic tools, a piece of clear acrylic, and (of course) some LEDs. Check out the following steps, or watch our DIY video for an example of how to recreate this look with Inspired LED!
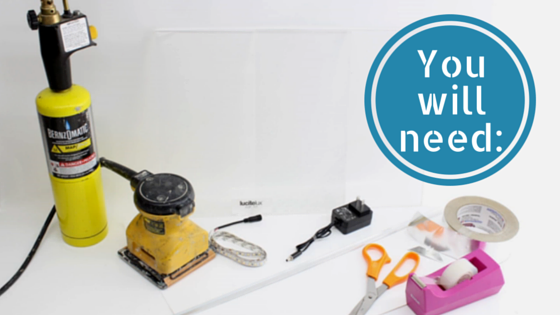
Materials:
- ¼ ” – ½” thick acrylic panel (thick enough to hide the LED tape along the edges, but not so thick that it completely traps the light)
- 220 – 60 grit sandpaper (selected based upon desired effect, the lower and coarser the grit, the more texturized final product will be)
- Blow torch
- Sheet of pearl white reflective material (if desired)
- Mega Bright Flexible LED Strip(s) in warm, pure, or cool white (equivalent in length to edges of acrylic) *we recommend ordering this strip with a flying lead for easy power connection
- 12V power supply
- Scissors
- Scotch or painter’s tape
To mount the LEDs, you can use either-
- Foil tape and a razor blade or
- Metal U-channel, dikes or tin snips, and clear silicone sealant (+ paper towels or old newspaper)
Disclaimer: This project requires the use of power tools and should be completed by qualified and experienced individuals in a safe location
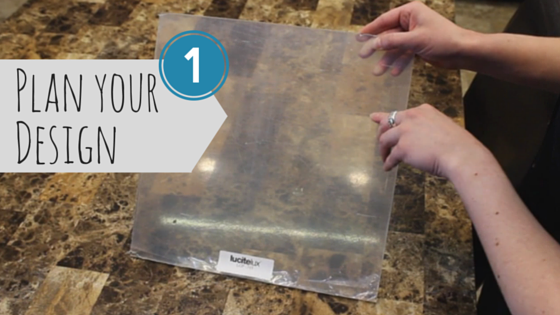
Step 1: Plan your design. Depending upon the application, your design will vary. If you are creating a single accent shelf, you will likely need to edge light just one side of your acrylic panel. If you are planning to illuminate a larger piece (such as a countertop), you will want to light around all four edges to ensure maximum light penetration. For our sample, we are using a single 1’ x 1’ sheet of 3/8” acrylic, which we will light along one side.
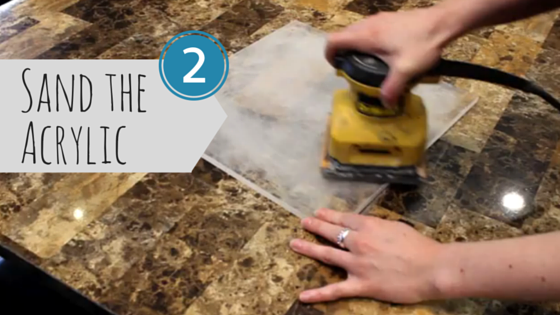
Step 2: Begin by sanding the underside of the acrylic. This will help to trap light within the panel, giving it that “glowing” effect. For a light, frosted look, use a fine, high grit sand paper. For a rougher, more texturized appearance, you’ll want to use a coarser, lower grit paper. For our panel, we utilized 110 grit. When sanding, be sure to keep moving in small circles, ensuring an even application across the entire panel.
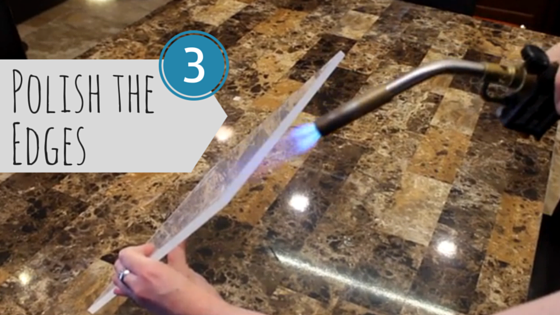
Step 3: Determine which of the acrylic edges you will be lighting. Use the blow torch on a light flame setting to carefully polish the selected edges until they shine clear. This will help to ensure that a maximum amount of light is able to penetrate the acrylic. When polishing, the blow torch should be held at a distance so that just the tip of the flame touches the acrylic, be sure to keep the flame moving consistently side to side to avoid melting.
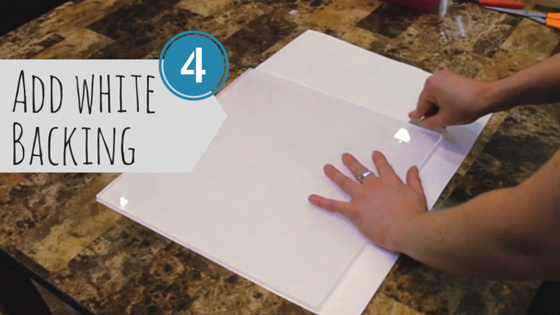
Step 4 (if desired): At this point, a sheet of pearl white material can be added to the underside of the acrylic panel to help achieve maximum light output. Adhere the white material to the sanded underside of the panel, then cut to size using scissors or a razor blade. For our project, we have chosen to set aside the white backing in favor of the frosted look achieved with the sander.
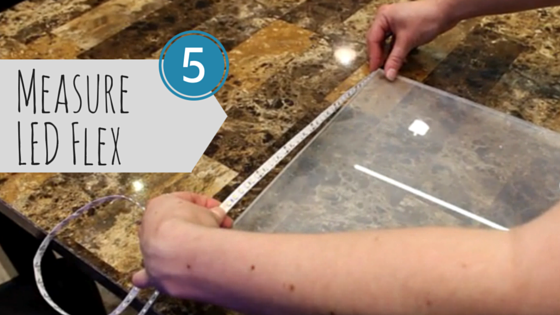
Step 5: Line the desired edge (or edges) of the acrylic panel with a flexible strip of mega bright LEDs, ensuring that the power input (or “flying lead”) will be positioned in a convenient location. Note that the LEDs should be facing inward, pressed against the acrylic. Once the LEDs have been aligned and measured, cut the flexible strip to length along the copper solder pads only, cutting at other points along the flex strip may cause components to fail. If lighting multiple edges, the LED strip should be allowed to wrap around each corner, do not cut each segment separately. Do not remove adhesive backing from the flex strip.
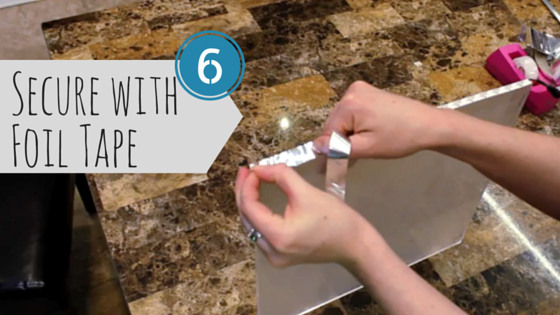
Step 6 (option 1): If utilizing foil tape to secure your LEDs, begin by using scotch or painter’s tape to temporarily hold LEDs in place along the outer edges of the acrylic panel. Once you are satisfied with the placement, begin adhering foil tape around the exterior of the LEDs. Be sure to remove the temporary tape as you go. Once the foil tape is in place, use a razor blade to carefully cut away the excess, leaving a clean edge.

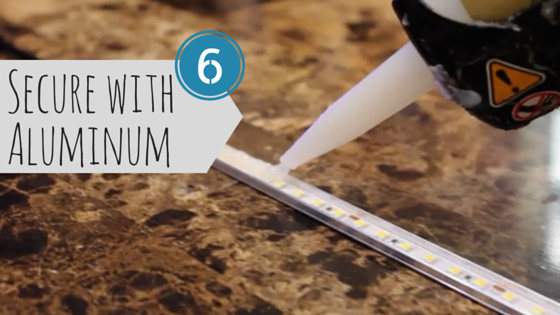
Step 6 (option 2): If utilizing a metal U-channel, first carefully measure and cut to size so that the channel will cover desired edge of acrylic. For our sample, we are using a shallow 8mm aluminum extrusion. Begin by peeling the adhesive backing off of the LED strip and placing it inside of the U-channel. Run a small bead of silicone sealant along the channel on top of the LEDs, then slide the acrylic panel into place. Use paper towels or newspaper to wipe away excess, taking care to avoid contact with clothing. Scotch or painter’s tape may be used to hold the U-channel in place while allowing silicone to cure for at least 30 minutes (see instructions on silicone bottle for curing time).
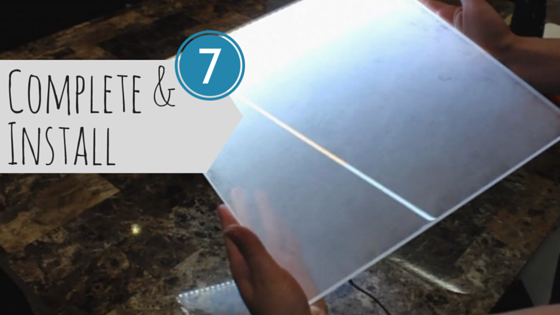
Step 7: Once your acrylic panel is complete, it can be installed in the desired location, and connected to a 12V DC power source. Then, voila! Your new lighted shelf is ready to glow!
Inspired LED offers a wide variety of easy-to-use lighting products for DIYers. For questions on this, or other lighting projects, contact our design team at design@inspiredled.com or give us a call at 480-941-4286. We are eager to help make your lighting vision a reality!